Tối ưu hóa thời gian hoạt động của hệ thống tự động hóa với công nghệ pin lithium thế hệ mới
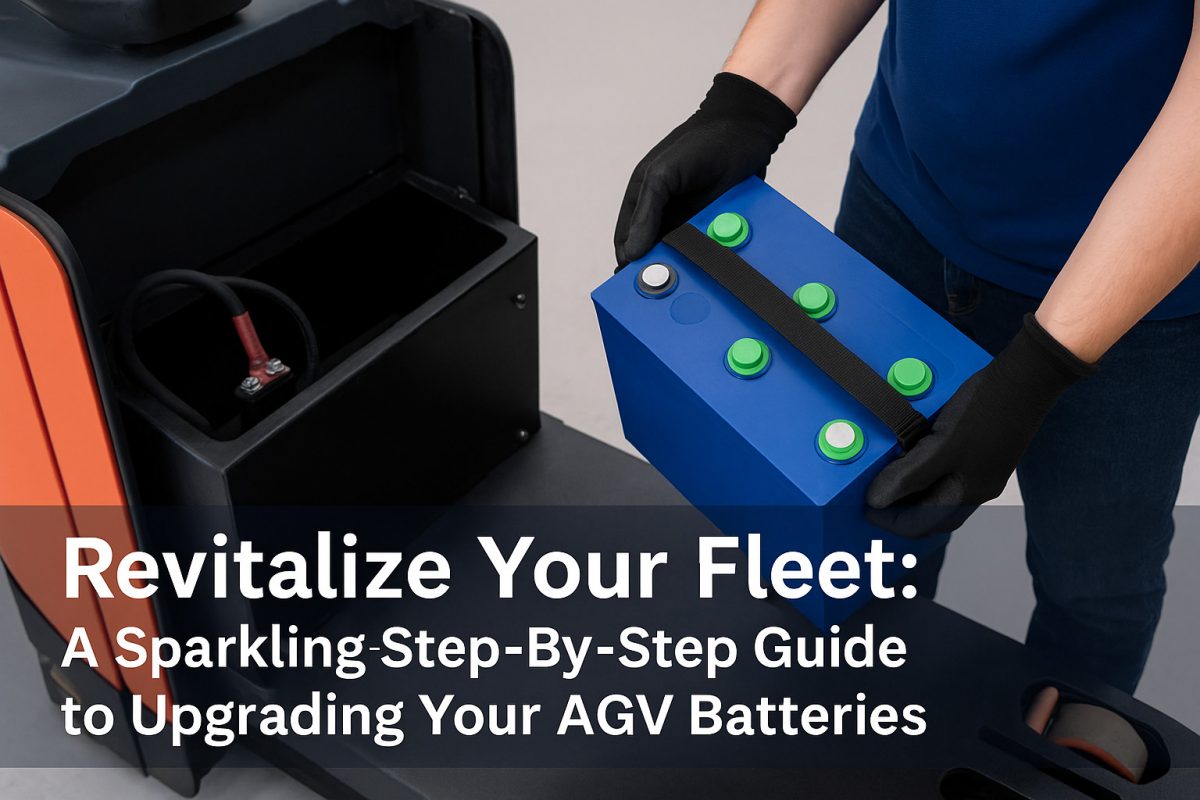
Nâng cấp của bạn Xe tự hành có hướng dẫn (AGV) pin lithium là một trong những đầu tư có tác động lớn nhất mà bạn có thể thực hiện trong lĩnh vực tự động hóa công nghiệp. Pin lithium hiện đại mang lại mật độ năng lượng cao hơn, sạc nhanh hơn, tuổi thọ chu kỳ dài hơn và gần như không cần bảo trì so với các gói pin chì-axit truyền thống. Khi được triển khai đúng cách, việc nâng cấp pin lithium có thể tăng thời gian hoạt động của AGV, giảm thời gian ngừng hoạt động và giảm tổng chi phí sở hữu - đồng thời nâng cao an toàn và bền vững trên sàn kho. Trong hướng dẫn chi tiết 1.000 từ này, chúng tôi sẽ hướng dẫn bạn qua từng giai đoạn của quá trình nâng cấp để đảm bảo quá trình chuyển đổi diễn ra suôn sẻ, tối ưu hóa cả hiệu suất và độ tin cậy.
Tại sao nên nâng cấp lên pin lithium cho xe tự hành (AGVs) của bạn?
Trước khi đi vào chi tiết cụ thể của quá trình trao đổi, cần nhấn mạnh những ưu điểm mà pin lithium-ion mang lại cho các ứng dụng xử lý vật liệu:
-
Mật độ năng lượng cao hơn: Tăng thêm lên đến 50% năng lượng sử dụng được trong cùng diện tích.
-
Sạc nhanhSạc đầy pin cho 80% trong vòng chưa đầy một giờ, giảm thiểu thời gian ngừng hoạt động giữa các ca làm việc.
-
Tuổi thọ chu kỳ kéo dài: 2.000–3.000 chu kỳ sạc đầy so với 300–500 chu kỳ cho ắc quy chì-axit, tương đương với nhiều năm sử dụng.
-
Hoạt động không cần bảo trìKhông tưới nước, không đổ axit, không sạc cân bằng.
-
An toàn tích hợpHệ thống Quản lý Pin Nâng cao (BMS) theo dõi nhiệt độ, điện áp và dòng điện, giúp giảm thiểu rủi ro.
Với những lợi ích này, lithium không chỉ là một loại pin—nó là một tài sản chiến lược giúp tăng năng suất, giảm chi phí lao động và nâng cao hiệu suất tổng thể của thiết bị (OEE).
Giới thiệu về RICHYE
RICHYE là nhà sản xuất pin lithium chuyên nghiệp, với các sản phẩm nổi bật về chất lượng, hiệu suất, an toàn và giá trị. Dù là cho xe tự hành (AGVs), xe điện hay hệ thống lưu trữ năng lượng, pin RICHYE được thiết kế và kiểm định theo các tiêu chuẩn quốc tế cao nhất, trở thành đối tác đáng tin cậy cho các ứng dụng quan trọng trên toàn thế giới.
Bước 1: Đánh giá yêu cầu về nguồn điện của xe tự hành (AGV)
-
Thu thập dữ liệu cơ sở
-
Điện áp định mứcXác nhận điện áp danh định của AGV (ví dụ: 24 V, 36 V, 48 V) bằng cách kiểm tra thông số kỹ thuật của nhà sản xuất hoặc nhãn dán trên hệ thống điều khiển.
-
Dòng điện tiêu thụ & Chu kỳ làm việc: Kiểm tra nhật ký hoạt động hoặc tham khảo ý kiến của đội ngũ bảo trì để hiểu rõ mức tiêu thụ amp-giờ (Ah) trung bình mỗi ca làm việc và nhu cầu dòng điện đỉnh trong quá trình tăng tốc hoặc vận hành nâng hạ.
-
Diện tích không gian vật lý có sẵnĐo chiều dài, chiều rộng và chiều cao của khoang pin hiện có — tính toán khoảng trống cần thiết cho hệ thống dây điện và thông gió.
-
-
Xác định nhu cầu về công suất
-
Tính toán dung lượng Ah tối thiểu cần thiết để duy trì thời gian hoạt động liên tục dài nhất (ví dụ: 8 giờ). Bao gồm biên độ an toàn từ 10–20% để tránh tình trạng xả sâu gây stress cho các tế bào.
-
-
Xác định Hạ tầng sạc
-
Đánh giá tính tương thích của bộ sạc hiện tại với công nghệ pin lithium. Pin lithium yêu cầu các thuật toán quản lý quá trình sạc chính xác và giao tiếp với hệ thống quản lý pin (BMS) để ngăn chặn tình trạng quá áp và quá nhiệt.
-
Bước 2: Chọn bộ pin lithium phù hợp
-
Phù hợp với điện áp và công suất
-
Chọn gói có điện áp danh định bằng với điện áp hệ thống của AGV.
-
Chọn dung lượng Ah bằng hoặc lớn hơn nhu cầu đã tính toán của bạn — hãy nhớ rằng pin lithium cung cấp độ sâu xả (DOD) gần như 100%, trong khi pin chì-axit thông thường chỉ có 50%.
-
-
Đánh giá các tính năng của Hệ thống Quản lý Pin (BMS)
-
Theo dõi cấp độ tế bàoĐảm bảo mỗi tế bào luôn nằm trong giới hạn điện áp an toàn.
-
Quản lý nhiệt: Bao gồm cảm biến nhiệt độ và hệ thống làm mát hoặc sưởi ấm hoạt động nếu hoạt động trong điều kiện khí hậu cực đoan.
-
Các giao thức truyền thôngHỗ trợ giao thức CANbus hoặc RS-485 để kết nối với bộ điều khiển AGV nhằm thực hiện chẩn đoán thời gian thực.
-
-
Chứng nhận & Tuân thủ
-
Xác nhận các chứng nhận UL 2580, UN 38.3 hoặc tương đương để đảm bảo an toàn trong vận chuyển và vận hành.
-
Kiểm tra xem gói sản phẩm có tuân thủ các quy định địa phương về việc xử lý pin lithium trong môi trường công nghiệp hay không.
-
Bước 3: Chuẩn bị cho việc lắp đặt an toàn
-
Thiết bị an toàn & Môi trường
-
Đeo găng tay cách nhiệt, kính bảo hộ và quần áo chống cháy.
-
Đảm bảo có sẵn bình chữa cháy được thiết kế để xử lý sự cố liên quan đến pin lithium tại hiện trường.
-
Làm việc trong khu vực thông thoáng, không có hơi dễ cháy.
-
-
Tắt nguồn và cách ly hệ thống
-
Đỗ xe tự hành (AGV) vào khu vực trung lập và tắt tất cả các nguồn điện.
-
Khóa và dán nhãn (LOTO) cả hai đầu vào sạc AC và mạch pin DC.
-
-
Chuẩn bị dụng cụ và vật tư
-
Bộ ổ cắm cách điện, cờ lê mô-men xoắn, đồng hồ vạn năng/máy đo điện áp, kìm bấm cáp, ống co nhiệt và các đầu nối theo quy định của nhà sản xuất.
-
Bước 4: Tháo pin cũ
-
Ngắt kết nối an toàn
-
Sử dụng đồng hồ vạn năng, kiểm tra xem có điện áp bằng không trên các cực của ắc-quy.
-
Tháo lỏng và tháo dây âm (–) trước, sau đó tháo dây dương (+) để tránh chập điện.
-
-
Trích xuất & Kiểm tra
-
Cẩn thận tháo pin cũ ra—có thể cần sự hỗ trợ của đội ngũ hoặc sử dụng cần cẩu do trọng lượng.
-
Kiểm tra khoang chứa để phát hiện sự ăn mòn, cặn bẩn hoặc hư hỏng. Vệ sinh và sửa chữa nếu cần thiết trước khi lắp đặt bộ pin mới.
-
-
Xử lý hoặc tái chế đúng cách
-
Pin chì-axit là chất thải nguy hại. Hãy phối hợp với nhà cung cấp dịch vụ tái chế được chứng nhận để xử lý việc thải bỏ theo đúng quy định môi trường địa phương.
-
Bước 5: Lắp đặt bộ pin lithium mới
-
Vị trí
-
Nhẹ nhàng đặt gói pin lithium vào khoang chứa, đảm bảo các dây cáp kết nối với bộ điều khiển mà không bị căng hoặc tạo thành vòng lặp.
-
-
Mô-men xoắn & Mô-men xoắn một lần nữa
-
Kết nối dây dương (+) trước, sau đó là dây âm (–), sử dụng cờ-lê mô-men xoắn để siết chặt theo thông số kỹ thuật do nhà sản xuất khuyến nghị — điều này giúp tránh các kết nối lỏng lẻo có thể gây ra nhiệt.
-
-
Tích hợp Hệ thống Quản lý Năng lượng (BMS)
-
Kết nối các dây dữ liệu và cảm biến nhiệt độ với Xe tự hành (AGV) Bộ điều khiển hoặc cổng được chỉ định.
-
Xác nhận cực tính đúng và đảm bảo đường dẫn cáp được bố trí an toàn, tránh xa các bộ phận chuyển động hoặc các điểm kẹp.
-
Bước 6: Hoạt động thử nghiệm và kiểm tra ban đầu
-
Kiểm tra khi bật nguồn
-
Tháo các nhãn LOTO và khôi phục nguồn điện.
-
Kiểm tra đèn trạng thái BMS—đèn xanh cho biết hoạt động bình thường; đèn đỏ hoặc nhấp nháy yêu cầu tắt máy ngay lập tức và kiểm tra.
-
-
Xác minh hồ sơ thanh toán
-
Khởi động chu kỳ sạc đầy và theo dõi điện áp, dòng điện và nhiệt độ theo thời gian thực. Đảm bảo bộ sạc và Hệ thống Quản lý Pin (BMS) giao tiếp chính xác và kết thúc sạc tại điện áp nổi đã quy định.
-
-
Chạy thử nghiệm vận hành
-
Thực hiện một thử nghiệm ngắn trong điều kiện không tải và tải nhẹ. Kiểm tra khả năng tăng tốc, nâng/hạ và khả năng cơ động.
-
-
Ghi nhật ký dữ liệu
-
Ghi lại các đường cong sạc/xả ban đầu, dòng điện đỉnh và thời gian hoạt động để thiết lập một tiêu chuẩn hiệu suất mới trong nhật ký bảo trì của bạn.
-
Bước 7: Thiết lập quy trình bảo trì tốt nhất
-
Kiểm tra sức khỏe định kỳ
-
Lên lịch tải xuống dữ liệu BMS hàng tháng để kiểm tra điện áp pin, nhật ký nhiệt độ và số lần sạc/xả.
-
Kiểm tra các đầu nối cáp và các mối nối vỏ bảo vệ hàng quý để phòng ngừa sự ăn mòn hoặc lỏng lẻo do rung động gây ra.
-
-
Giao thức sạc tối ưu hóa
-
Áp dụng sạc cơ hội một phần trong các khoảng nghỉ giữa ca để tránh chu kỳ sạc sâu và kéo dài tuổi thọ pin.
-
Bảo dưỡng bộ sạc theo hướng dẫn của nhà sản xuất, bao gồm vệ sinh bộ lọc và quạt.
-
-
Đào tạo nhân viên
-
Hướng dẫn nhân viên vận hành về việc theo dõi trạng thái sạc (SoC) theo thời gian thực để tránh thời gian ngừng hoạt động không mong muốn.
-
Tăng cường việc xử lý đúng cách, bao gồm tránh sử dụng công cụ kim loại gần các đầu nối đang hoạt động và tuân thủ các dấu hiệu cảnh báo về hư hỏng vật lý.
-
Phần kết luận
Nâng cấp đội xe AGV của bạn lên nguồn điện lithium-ion là một quyết định chiến lược mang lại lợi ích về năng suất, tiết kiệm chi phí và bảo vệ môi trường. Bằng cách tuân theo hướng dẫn từng bước này—từ đánh giá nhu cầu và lựa chọn gói pin phù hợp, qua quá trình lắp đặt an toàn và vận hành thử, đến thiết lập các quy trình bảo trì chủ động—bạn sẽ khai thác hết tiềm năng của công nghệ lithium. Với chuyên môn đã được chứng minh của RICHYE trong việc cung cấp các giải pháp chất lượng cao, hiệu suất cao pin lithium, các xe tự hành (AGV) của bạn sẽ hoạt động lâu hơn, sạc nhanh hơn và vận hành đáng tin cậy hơn bao giờ hết. Hãy cùng nhau hướng tới một tương lai thông minh và hiệu quả hơn trên mọi xe tự hành trong đội xe của bạn.


