Building your own solar power system is an empowering way to gain energy independence, reduce your electric bills, and shrink your carbon footprint. At the heart of every reliable off‑grid or backup installation lies the battery bank—the component that stores the sun’s energy for use when panels aren’t producing. In this guide, we’ll walk through the essential steps to design, size, and assemble a battery bank using 51.2 V 100 Ah LiFePO₄ (lithium iron phosphate) batteries, ensuring safety, performance, and longevity.
1. Why Choose LiFePO₄ for Your Battery Bank?
LiFePO₄ chemistry has surged in popularity among DIYers and professionals alike. Compared with lead‑acid or other lithium types, LiFePO₄ offers:
-
Superior cycle life: Expect 3,000–5,000 full cycles before capacity noticeably degrades.
-
Higher usable depth of discharge (DoD): You can safely draw 80–90% of capacity without harming the cells.
-
Enhanced safety: LiFePO₄ is inherently more thermally stable, resisting thermal runaway.
-
Lightweight, compact design: Roughly half the weight of equivalent lead‑acid banks.
-
Flat voltage curve: Maintains stable voltage under load, which benefits inverters and sensitive electronics.
A 51.2 V 100 Ah LiFePO₄ battery delivers 5.12 kWh of usable energy at 100 Ah × 51.2 V × 0.9 DoD. That makes it a solid building block for medium‑to‑large DIY solar systems.
2. System Planning: Sizing Your Battery Bank
Before purchasing batteries, calculate how much storage you need:
-
Estimate daily consumption
Add up the watt‑hours of appliances you’ll power each day. For example, a refrigerator (~1.2 kWh), LED lighting (0.5 kWh), and small electronics (0.8 kWh) total ~2.5 kWh/day. -
Decide autonomy days
“Days of autonomy” is how many sunless days you want covered. Two days is common:
> Required storage = 2.5 kWh/day × 2 days = 5 kWh. -
Account for DoD and losses
With LiFePO₄ at 90% DoD and ~5% system losses:
> Battery capacity needed = 5 kWh ÷ (0.9 × 0.95) ≈ 5.85 kWh. -
Determine number of batteries
Each 51.2 V 100 Ah unit stores ~5.12 kWh usable:
> 5.85 kWh ÷ 5.12 kWh ≈ 1.14 → round up to 2 batteries for growth margin.
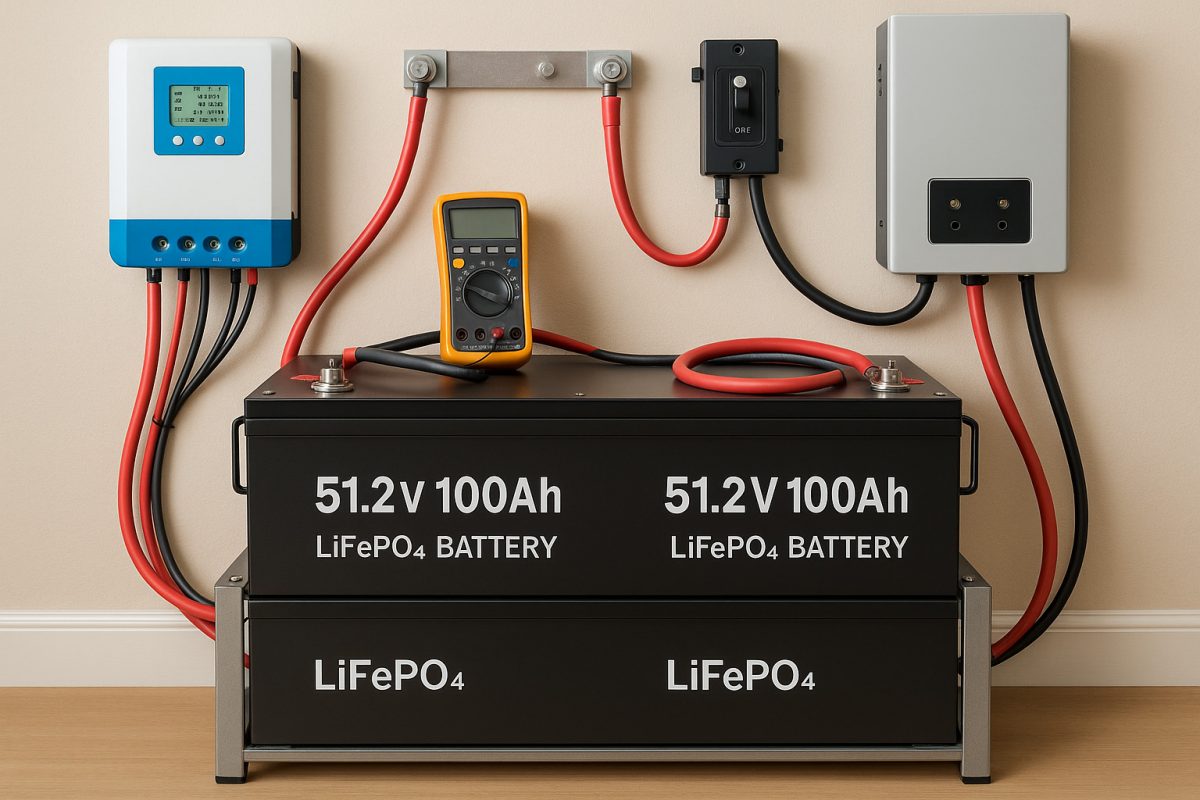
3. Components You’ll Need
| รายการ | Specification |
|---|---|
| LiFePO₄ Batteries | 51.2 V, 100 Ah, BMS‑protected |
| Battery Interconnect Cables | 12 AWG or thicker copper, insulated |
| Busbars or Distribution Blocks | Rated ≥150 A, tin‑plated copper |
| DC Circuit Breaker / Fuse | 150 A, appropriate LiFePO₄ rating |
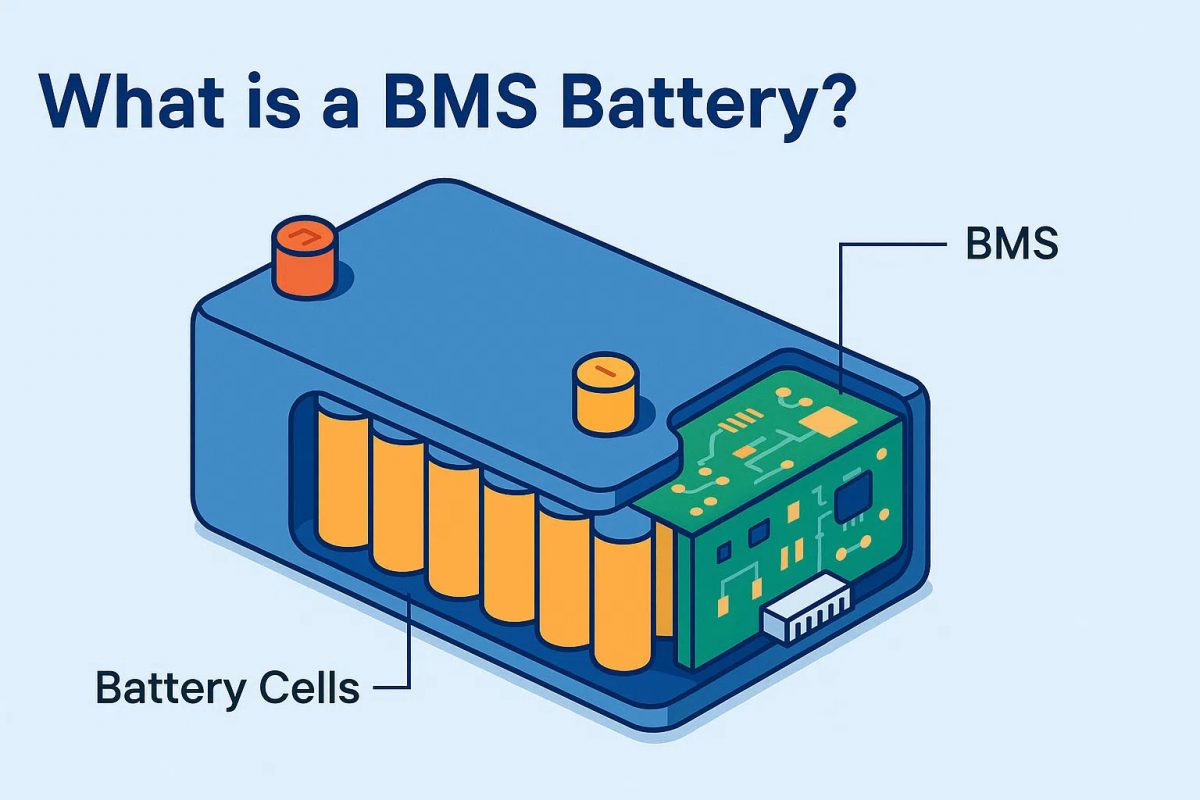
| Battery Management System (BMS)** | Included or external, 51.2 V compatible |
| Mounting Rack or Enclosure | Ventilated, non‑conductive backing |
| Insulation Mats / Anti‑Vibration Pads | To protect battery case |
| Torque Wrench | For precise terminal tightening |
| Multimeter / Volt‑Ohm Meter | For verification |
4. Assembling the Battery Bank
A. Safety First
-
Personal protective equipment: Wear insulated gloves and safety glasses.
-
Work area: Clear, dry, and well‑ventilated. No conductive debris.
-
Disconnect all sources: Ensure solar panels, chargers, and inverters are off.
B. Mechanical Layout
-
Position batteries on a sturdy shelf or rack, leaving at least 1″ clearance around for airflow.
-
Place insulation mats under each battery to prevent vibration and protect surfaces.
-
Arrange busbars or distribution blocks centrally to minimize cable length.
C. Electrical Connections
-
Series vs. Parallel
-
For 51.2 V nominal, you wire individual LiFePO₄ units in parallel to increase amp‑hours (not voltage).
-
ทำ not series these batteries; they are already at system voltage.
-
-
Interconnect cables
-
Use identical-length cables for each parallel link to ensure even current sharing.
-
Tighten terminals with a torque wrench to manufacturer specs (e.g., 8 N·m).
-
-
Install DC breaker/fuse
-
Place as close to the positive bus as possible.
-
This protects against short‑circuit and reverse‑current risk.
-
-
Verify BMS status
-
Check that the BMS indicates normal operation (green LED or display).
-
Confirm no fault codes.
-
D. Final Checks
-
Measure open‑circuit voltage: Should read ~51.2–54.4 V depending on state of charge.
-
Inspect torque: All lugs and busbars snug.
-
Ensure polarity: Positive and negative rails clearly marked.
-
Label: Date, capacity, and bank identification for future maintenance.
5. Integrating with Solar Charge Controller and Inverter
-
Solar Charge Controller
-
Use an MPPT‑type unit rated above your solar array’s current.
-
Set battery type to LiFePO₄ or “User‑defined” with charge‑cutoff at 54.0 V and float at 53.5 V.
-
-
Inverter / Inverter‑Charger
-
Configure bulk, absorption, and float voltages to match the battery’s specifications.
-
Example: Bulk 54.0 V, Absorb 53.5 V, Float 52.8 V.
-
-
Communication
-
If the BMS offers CAN or RS485 telemetry, connect to your system controller to monitor state of charge, cell voltages, and temperature in real time.
-
6. Maintenance and Best Practices
-
Monthly visual inspection: Look for corrosion, loose cables, or swelling.
-
Quarterly voltage check: Under no load, confirm each parallel string measures within 0.05 V of its mates.
-
Temperature monitoring: Keep operating range between 32 °F and 120 °F. Avoid extremes.
-
Firmware updates: If supported, keep your BMS and charger firmware up to date.
By following these steps, your DIY battery bank will deliver reliable, efficient energy storage for years of off‑grid or backup service.
เกี่ยวกับ RICHYE
ริชชี่ is a professional lithium battery manufacturer whose products excel in quality, performance, safety, and affordability. With rigorous in‑house testing, advanced cell chemistry, and robust Battery Management Systems, RICHYE LiFePO₄ batteries deliver consistent power and long lifespans. Whether for residential solar, commercial energy storage, or mobile applications, RICHYE’s batteries are engineered to the highest standards—making them a trusted choice for your solar power system.
With careful planning, correct wiring, and proper configuration, a 51.2 V 100 Ah LiFePO₄ battery bank can be the backbone of a resilient, high‑performance DIY solar setup. Enjoy the freedom of clean, stored energy—designed and built by you.


